Routes play a crucial role in managing inventory workflows. The Routes and Rules feature in Odoo’s Inventory app allows users to define the path that products take as they move through the warehouse. In this step-by-step guide, we will walk you through the process of setting up routes in Odoo 17, so you can optimize your workflow and enhance productivity.
How do Routes & Rules in Odoo 17 work?
In Odoo, you can configure a product’s supply chain process using Routes, which consist of sets of so-called Pull and Push Rules. Once configured, the Inventory app can automatically generate transfers based on these rules.
In simple terms, Routes define the path that a product takes within the warehouse, while Rules define the conditions under which a product should be moved along that path.
For example, in Odoo a Route might specify that products should be transferred from the Receiving area to the Storage area, while a Rule might specify that products with a certain stock keeping unit (SKU) should be automatically transferred from the Receiving area to the Storage area once they reach a certain quantity.
Automated routes can be used for many purposes
With the Routes and Rules feature in Odoo 17 businesses can reduce the amount of manual labor involved in moving products between different areas of the warehouse. It also helps to ensure that products are moved efficiently, leading to shorter lead times.
The Routes and Rules feature in Odoo 17 holds benefits for various industries:
1. Manufacturing
- Smoother Production: Automate material flow from reception to production to dispatch.
- Higher Productivity: Use smart rules for timely material handling and increased output.
2. E-commerce
- Quicker Order Fulfillment: Move products to shipment as soon as an order is confirmed.
- Happy Customers: Speedy, precise order processing boosts loyalty.
3. Retail
- Always Stocked Shelves: Keep products flowing to where customers can find them.
- Increased Sales: Keep the right amount of stock to ensure continuous product availability.
Pre-configured vs. Custom routes in Odoo 17
Odoo offers two types of routes for inventory management: pre-configured and custom.
Pre-configured routes are ready-to-use solutions designed for common industry practices, such as dropshipping or cross-docking, allowing businesses to quickly adopt standard logistics processes. Custom routes, on the other hand, provide flexibility and enable businesses to tailor the movement and handling of products to their unique operational needs. This customization can address complex use cases that pre-configured routes cannot, by defining specific conditions for how and when products are moved.
The choice depends on whether your business prefers ease of use or needs specific, customized control over their inventory.
How to set up pre-configured routes in Odoo 17 step-by-step
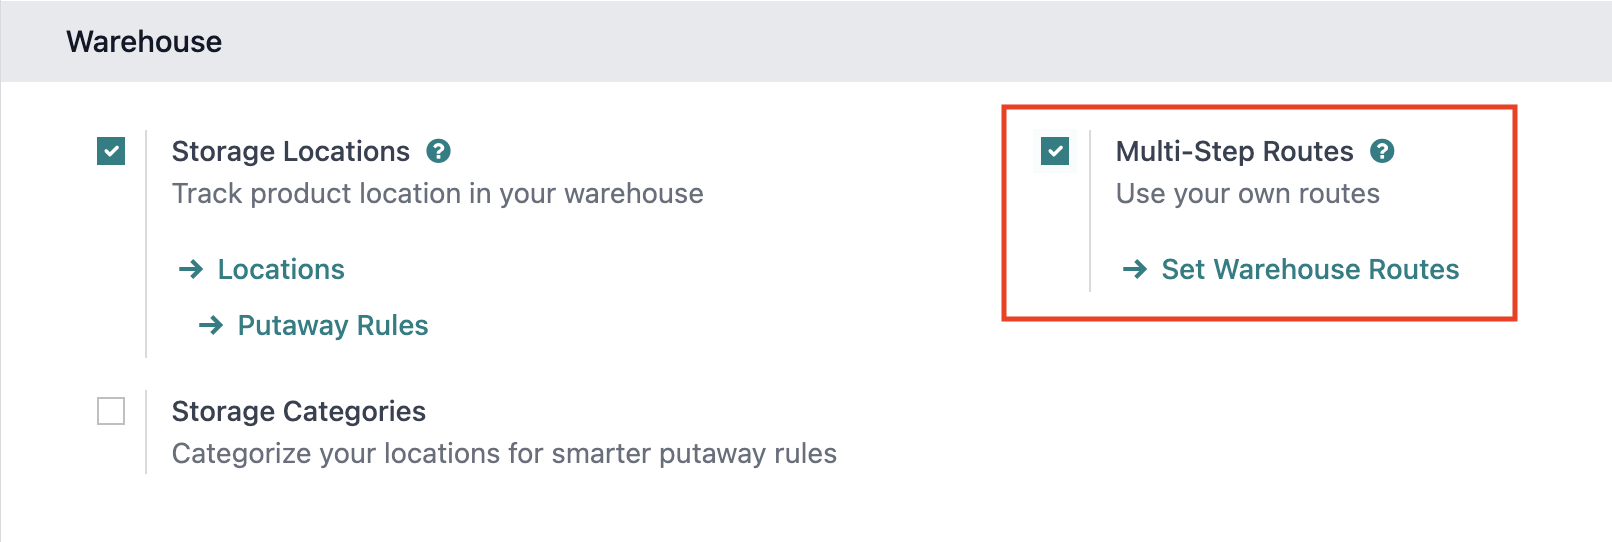
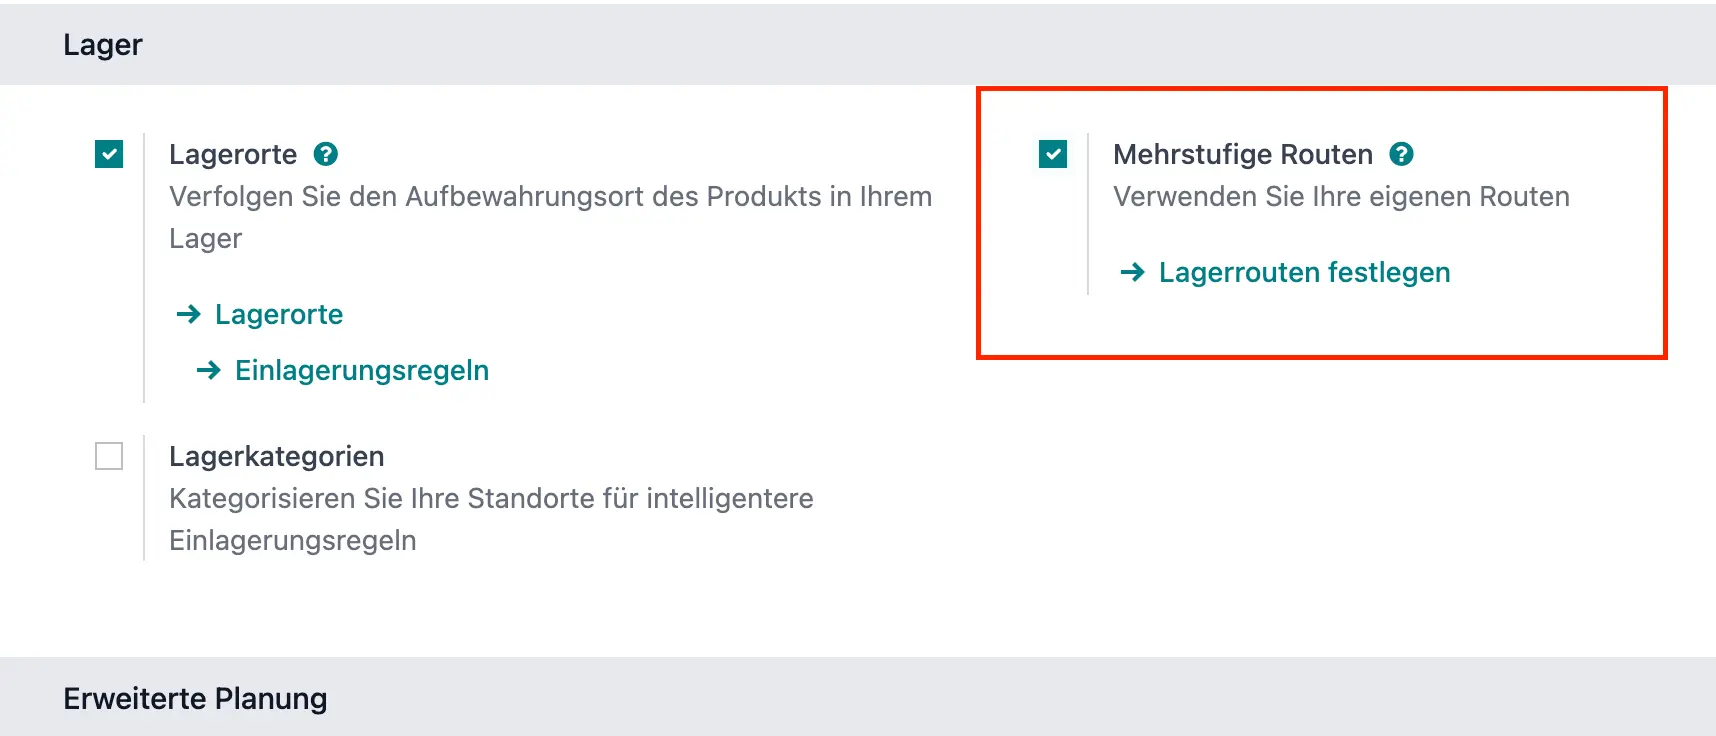
Step 1: Enable Multi-step Routes
- Go to the Inventory app in Odoo
- Navigate to Configuration > Settings and scroll down to the Warehouse section
- Click on “Multi-Step Routes” to activate Routes
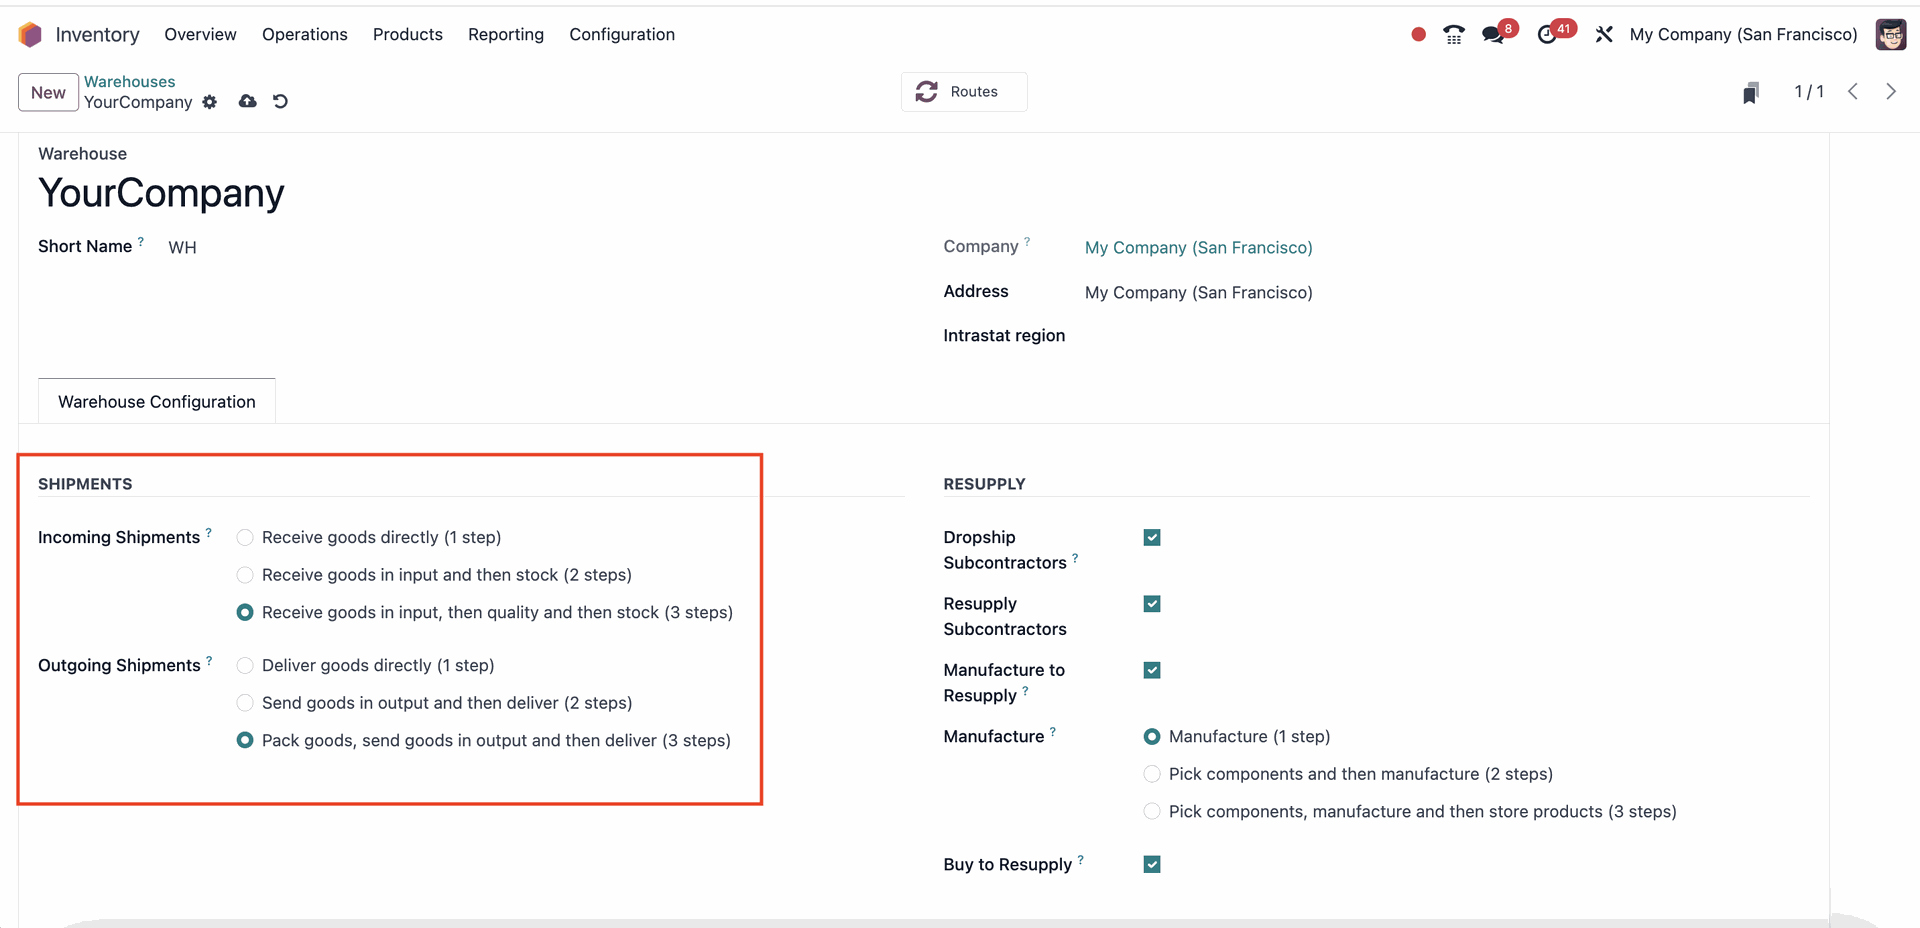
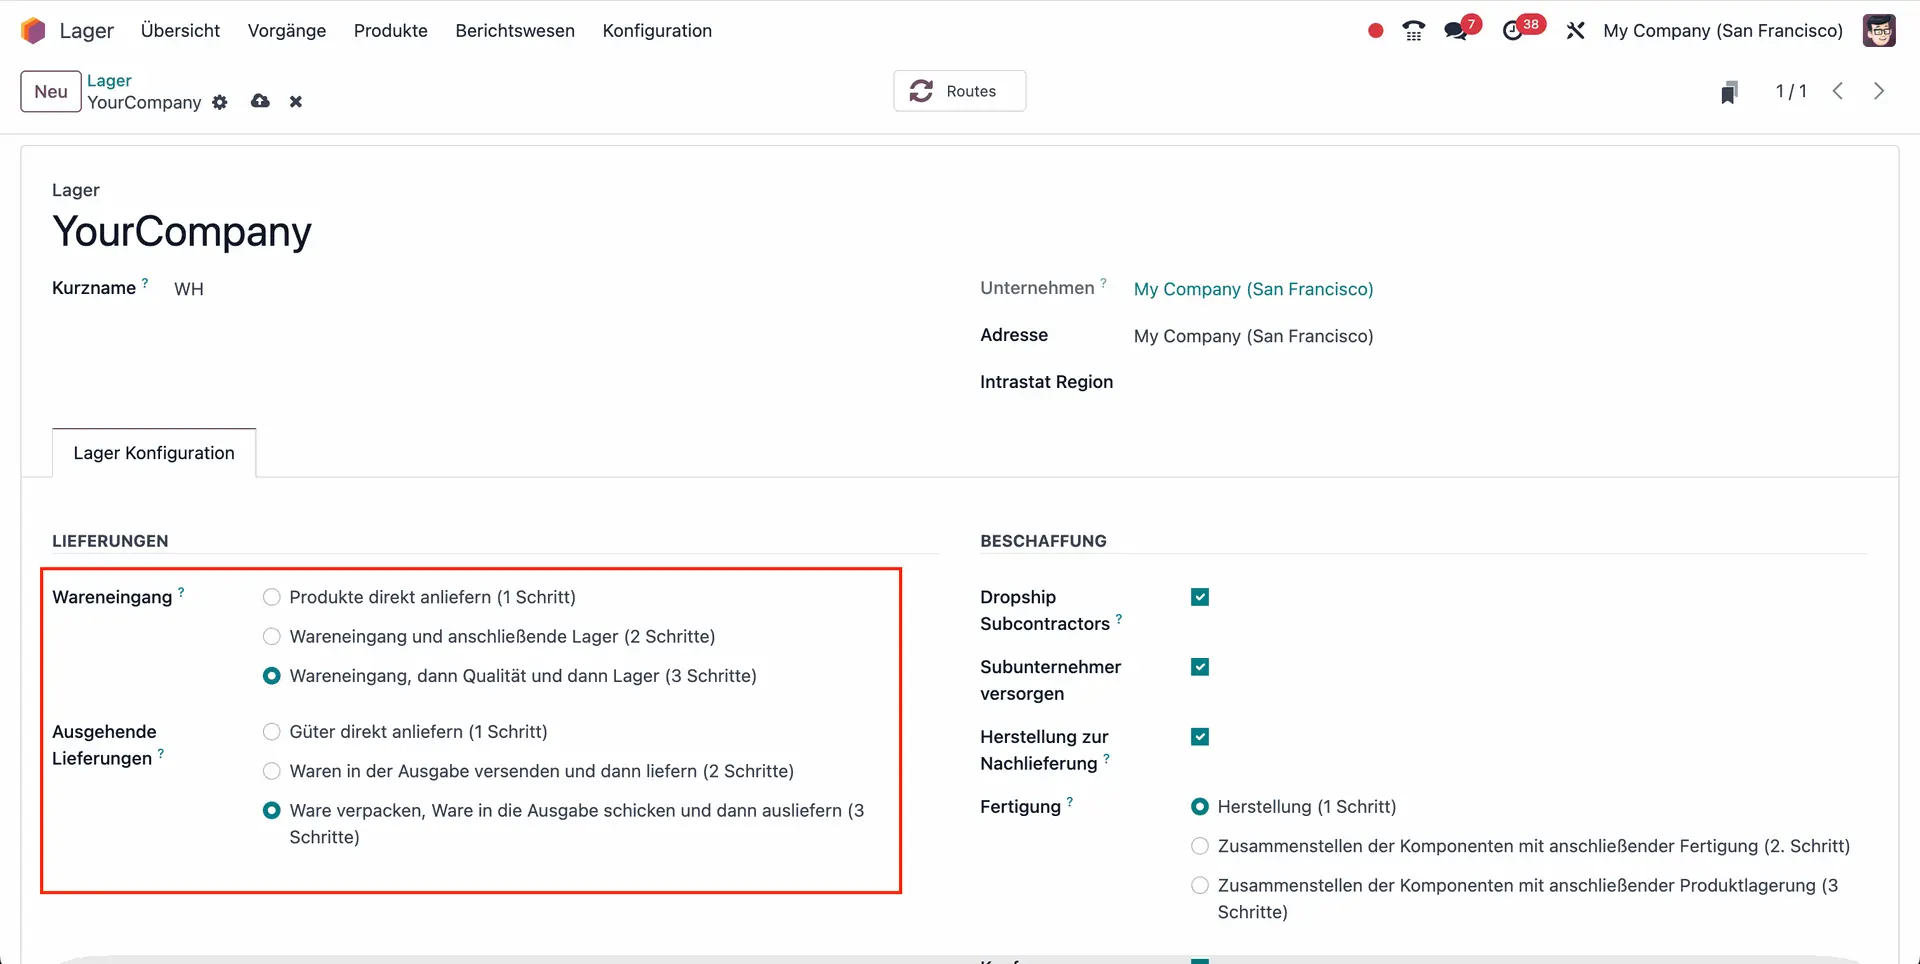
Step 2: Set Warehouse Configurations
- Go to Configuration > Warehouses and open an existing Warehouse form
- There, you’ll be able to view already pre-configured Warehouse Routes like “Incoming Shipments”, “Outgoing Shipments".
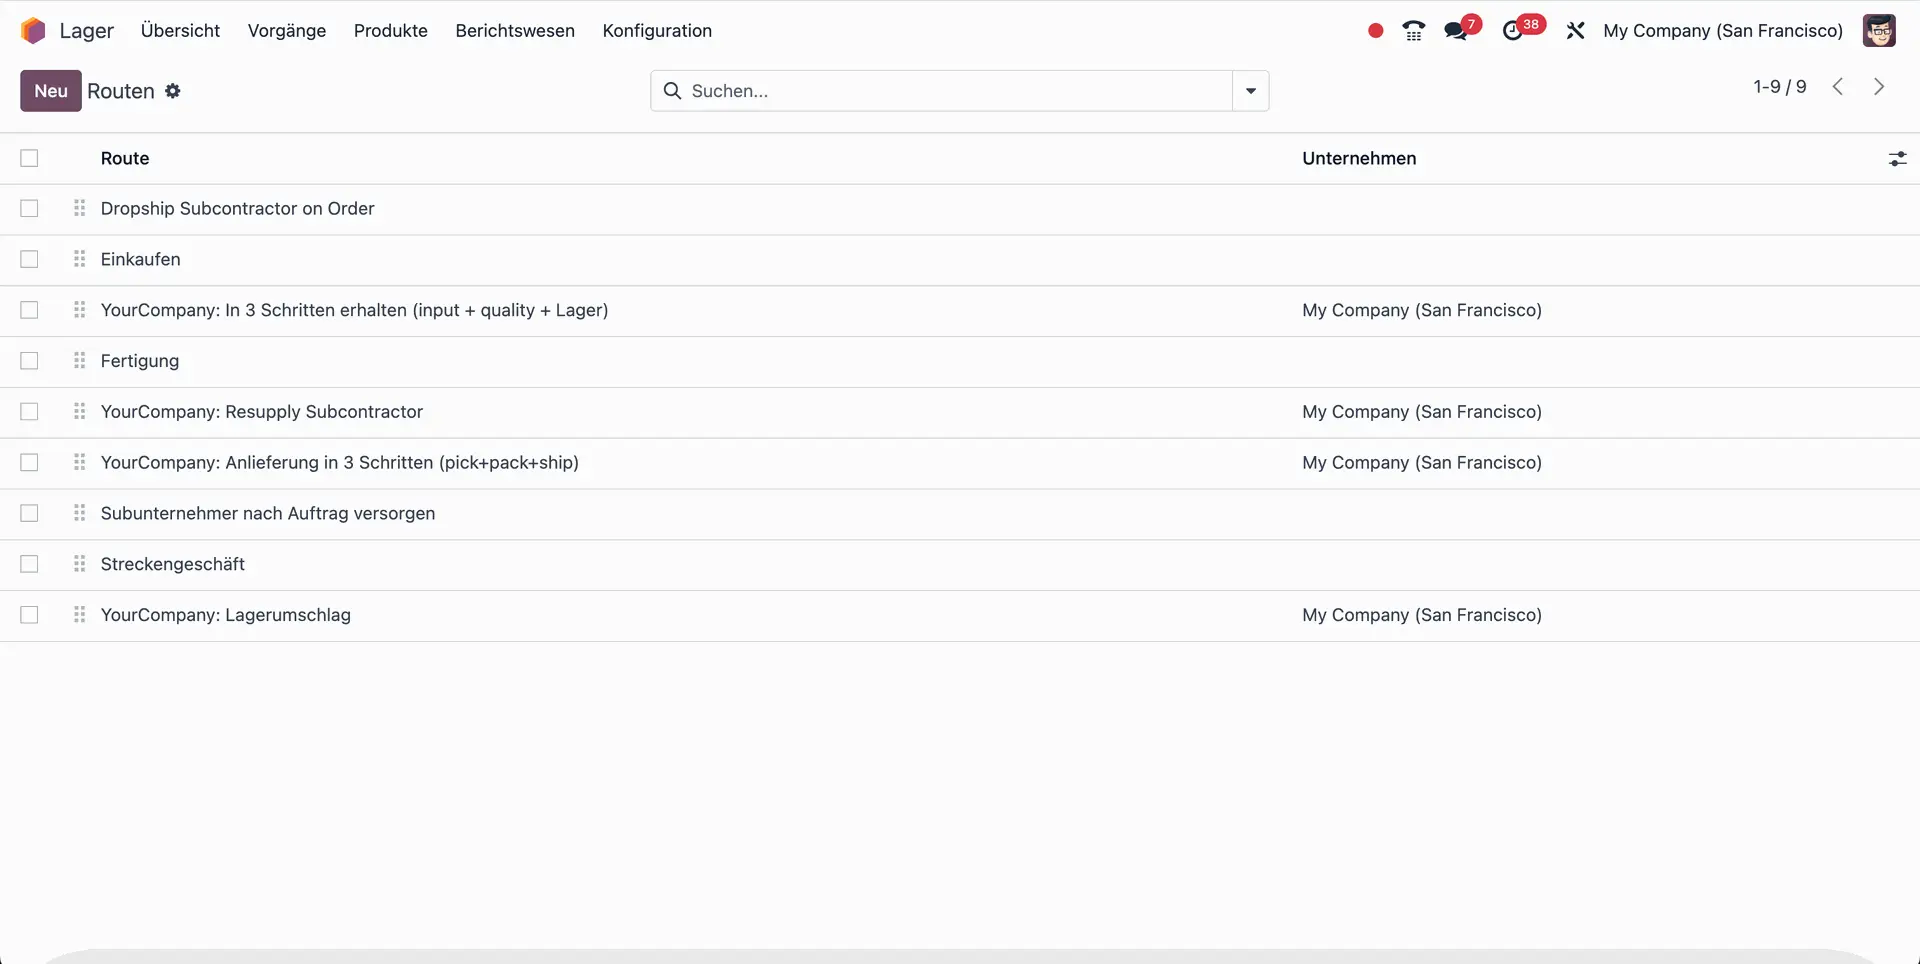
Step 3: Check Odoo-generated Routes
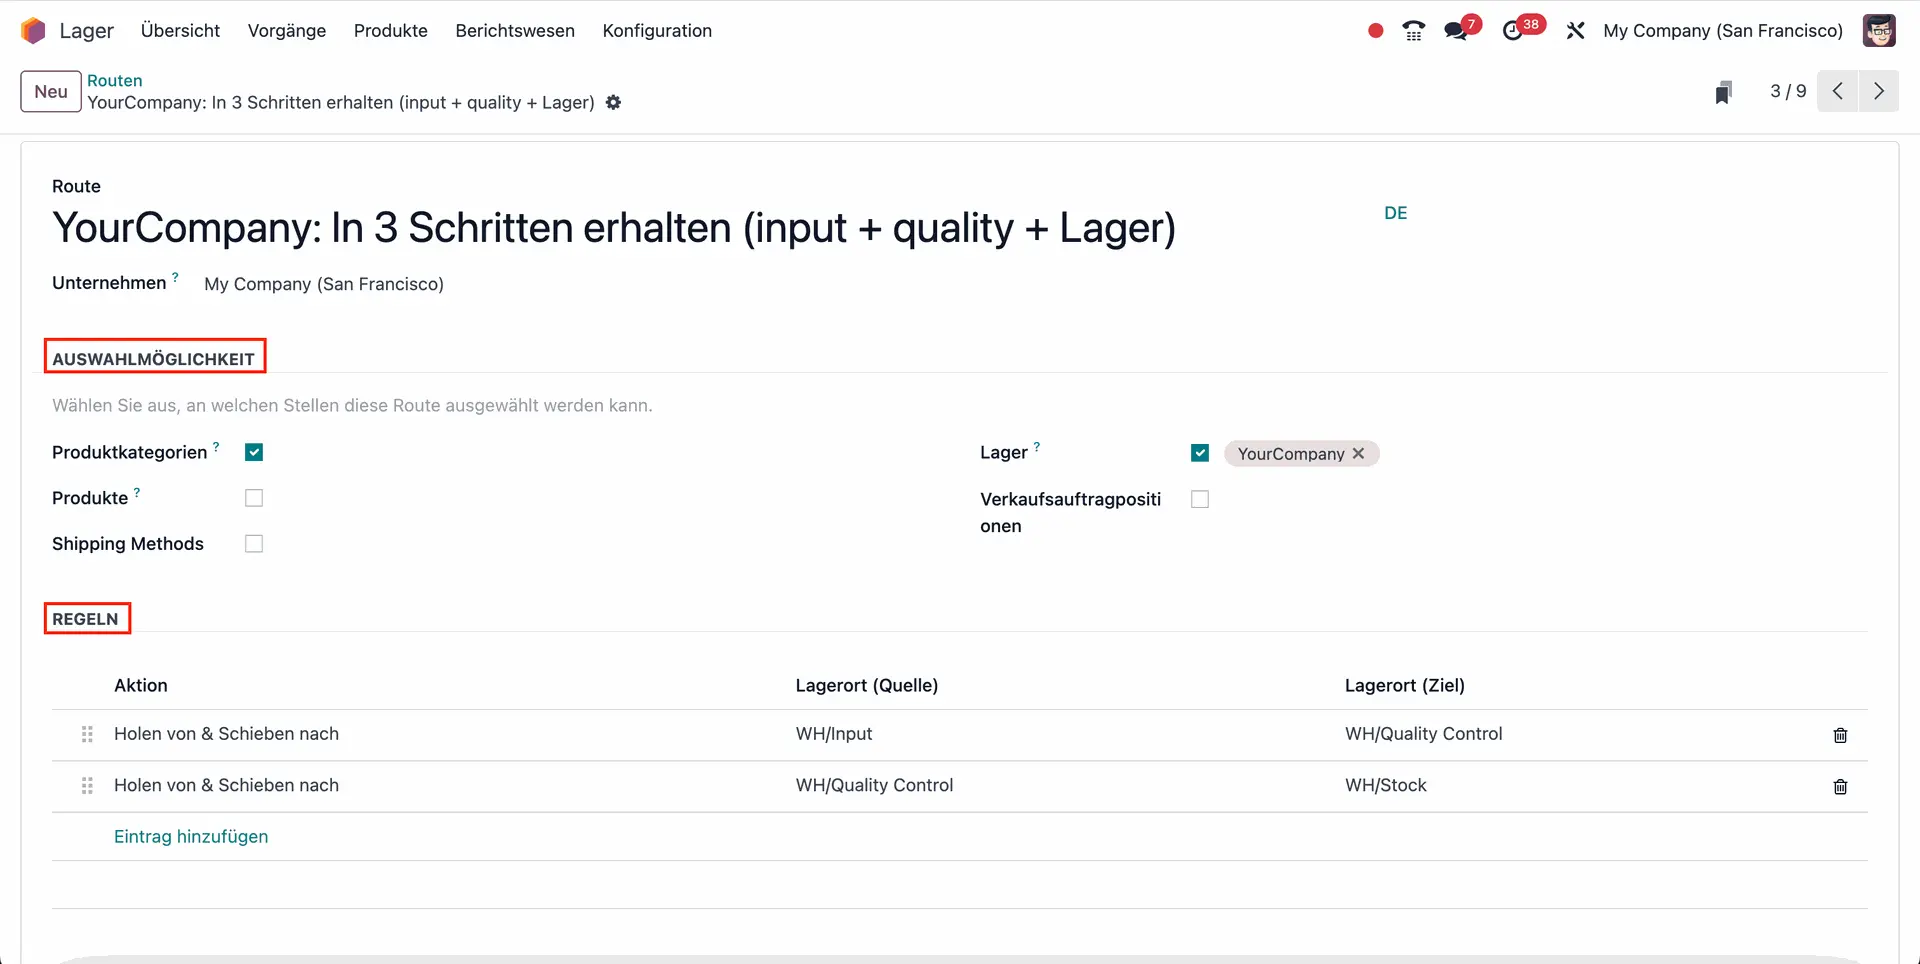
- Once you have set the Ingoing & Outgoing Shipments routes, navigate to Configuration > Routes. Here you will find the routes that Odoo automatically generated
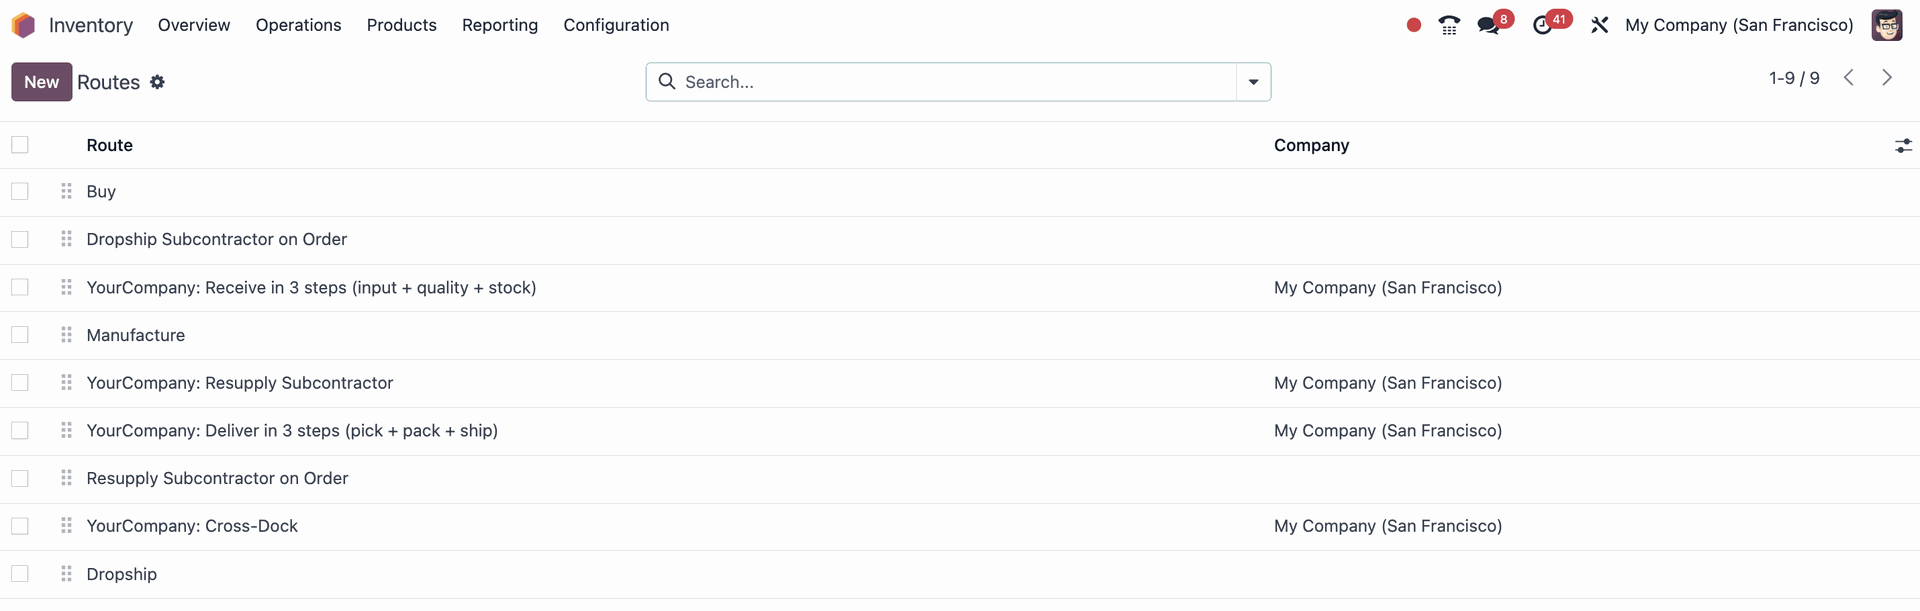
- Click on a route to open the route form. In the route form, you can see which places the route is Applicable On. At the bottom of the route form, you can also view the specific Rules for the route. Each Rule has an Action, a Source Location, and a Destination Location.

Pro tip: You can set routes so that they only apply to a specific company. This is especially useful for multi-company environments, for instance when a user can have a company and warehouse in country A and a second company and warehouse in country B.
How to configure and create custom routes in Odoo 17
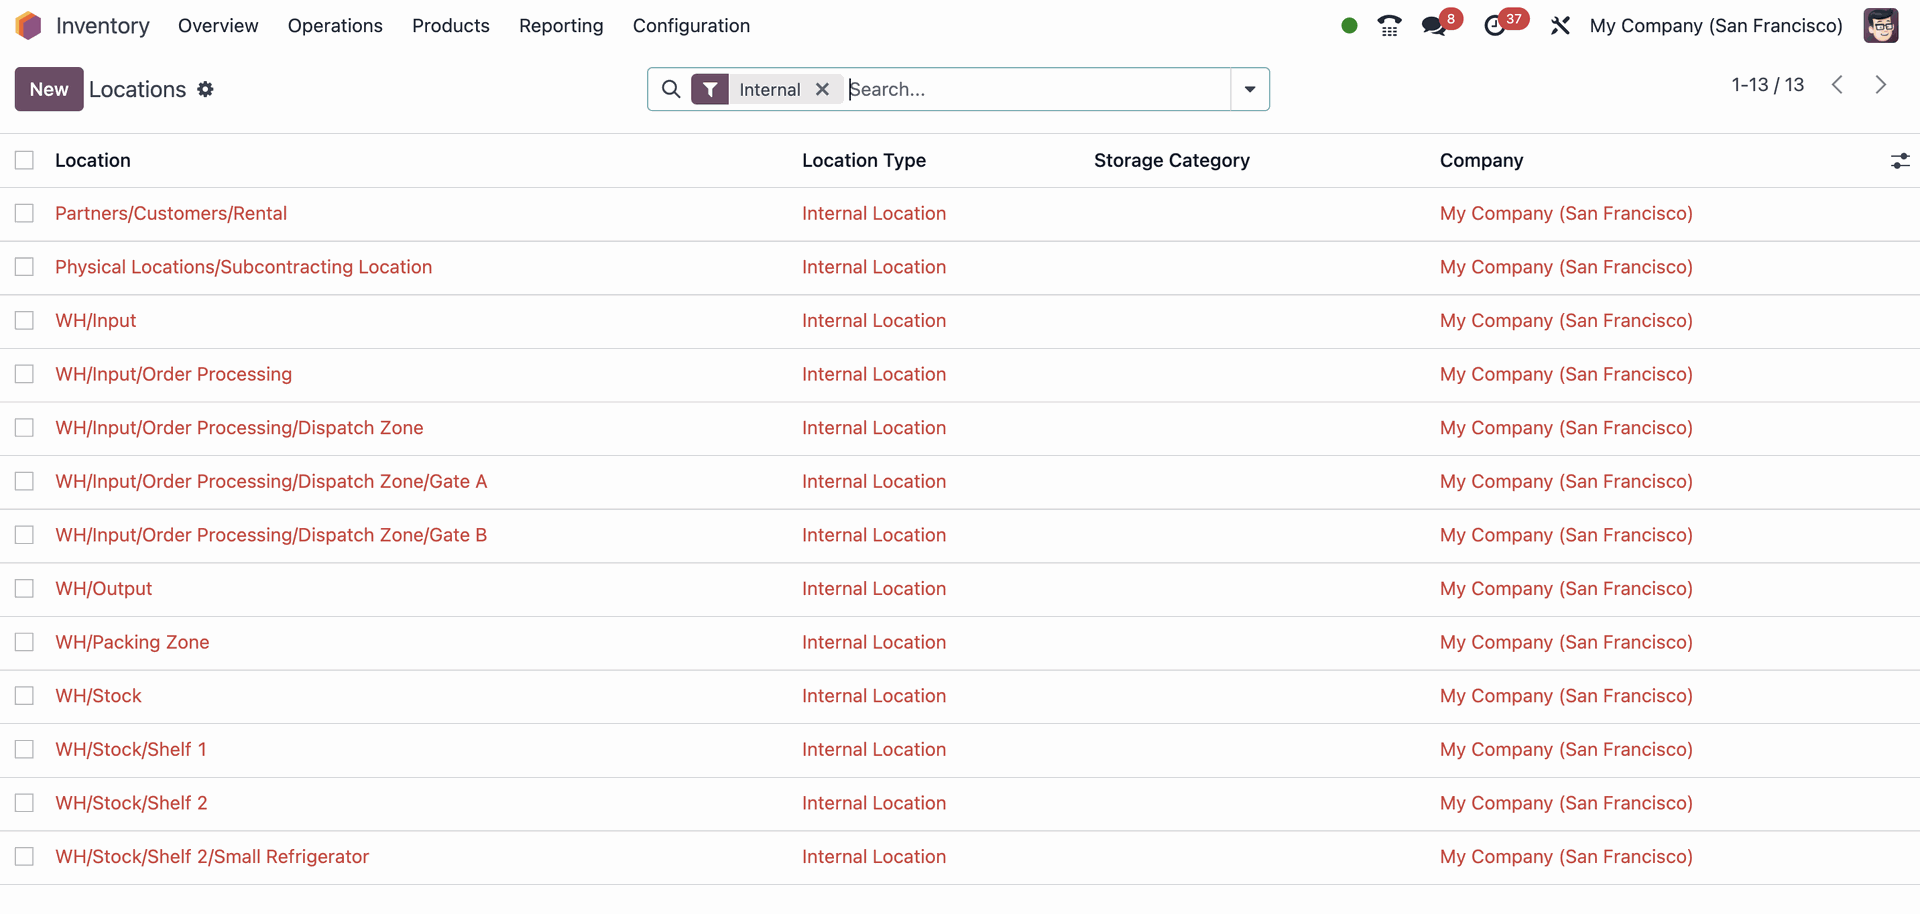
1. Check warehouse structure configurations
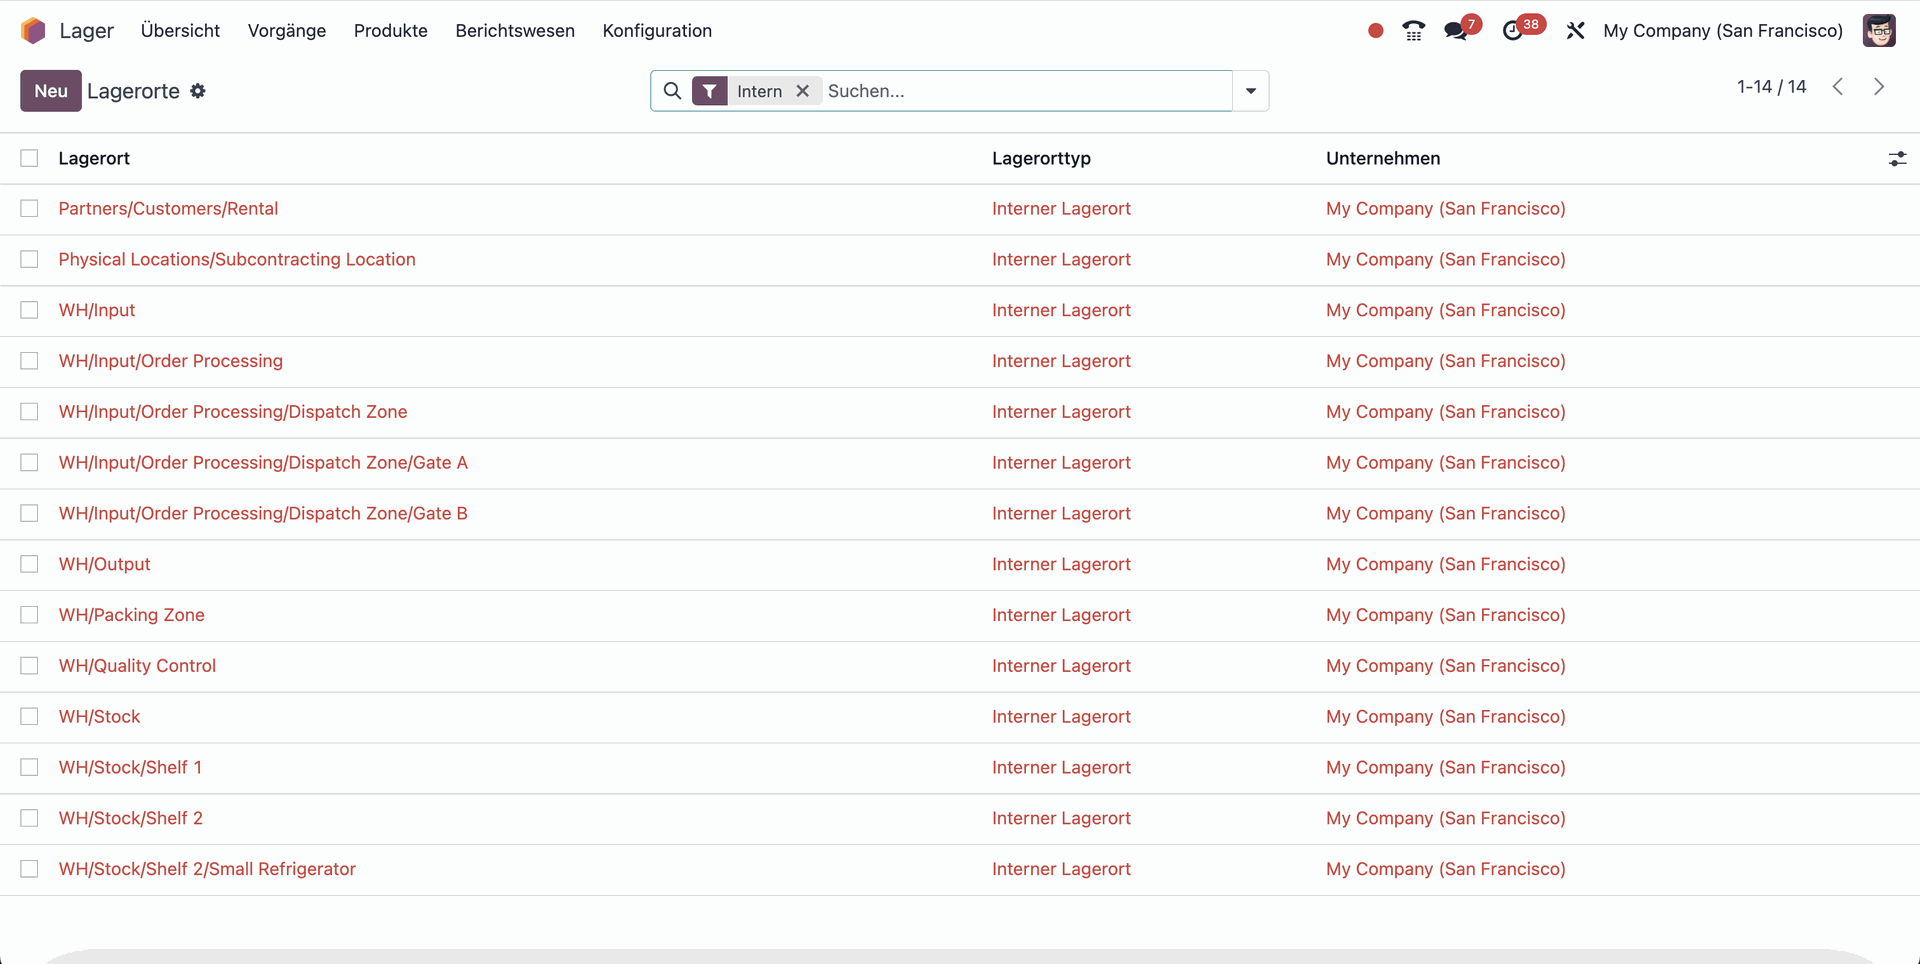
First, you need to check that the structure of your warehouse is well defined. This includes locations for each area of the warehouse, such as the receiving area, storage area, and shipping area. You can do this by navigating to Configuration > Locations.
2. Create a new Route
Once you have defined your warehouse structure, you can create a Route that defines the path that products will take as they move through the warehouse.
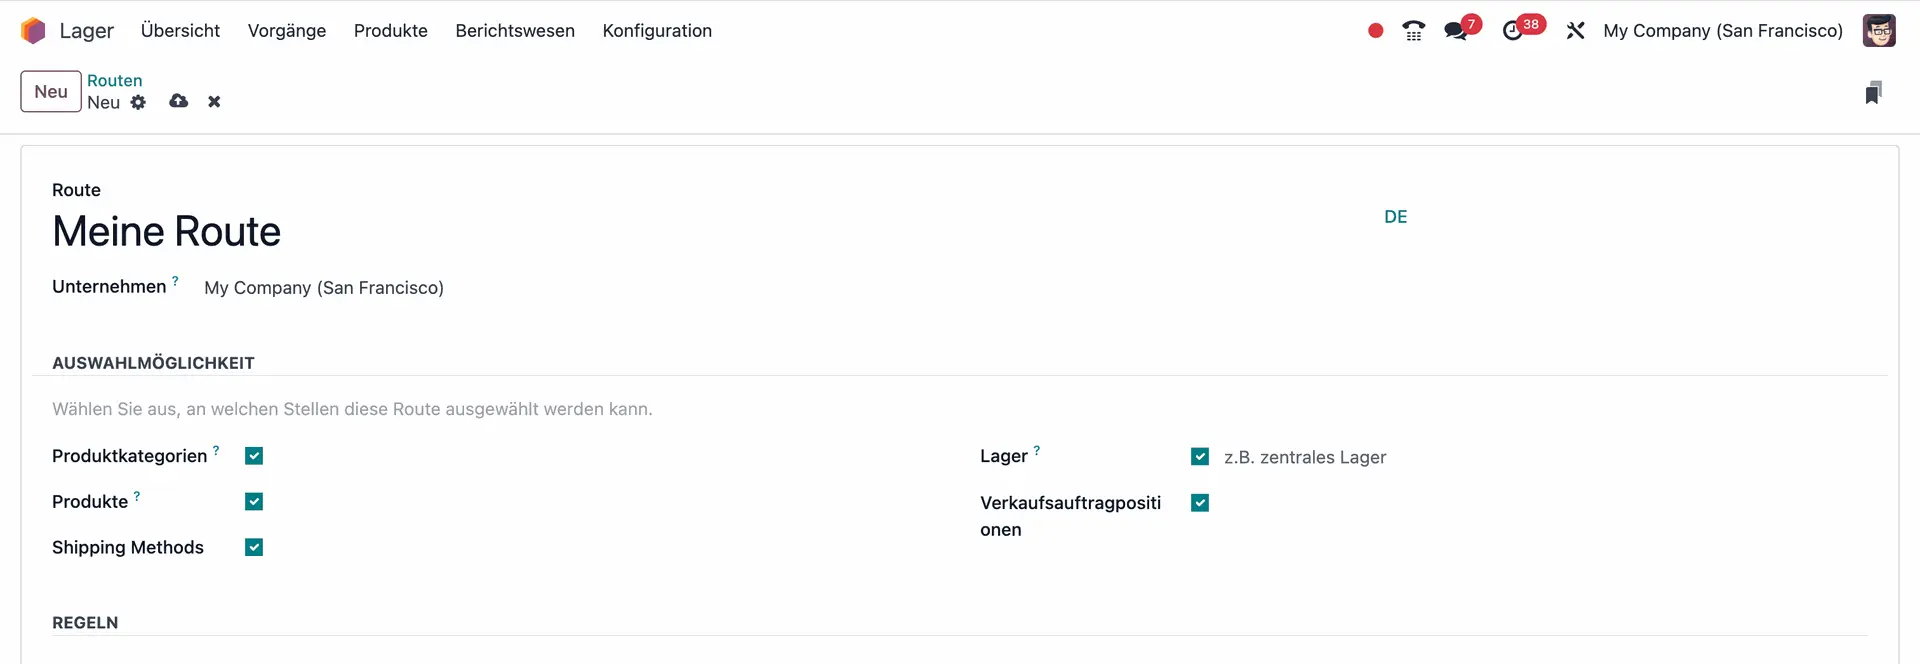
To create a Route, navigate to Configuration > Routes and click the “New” button. Give your Route a name and select the places in which this Route would be Applicable On.
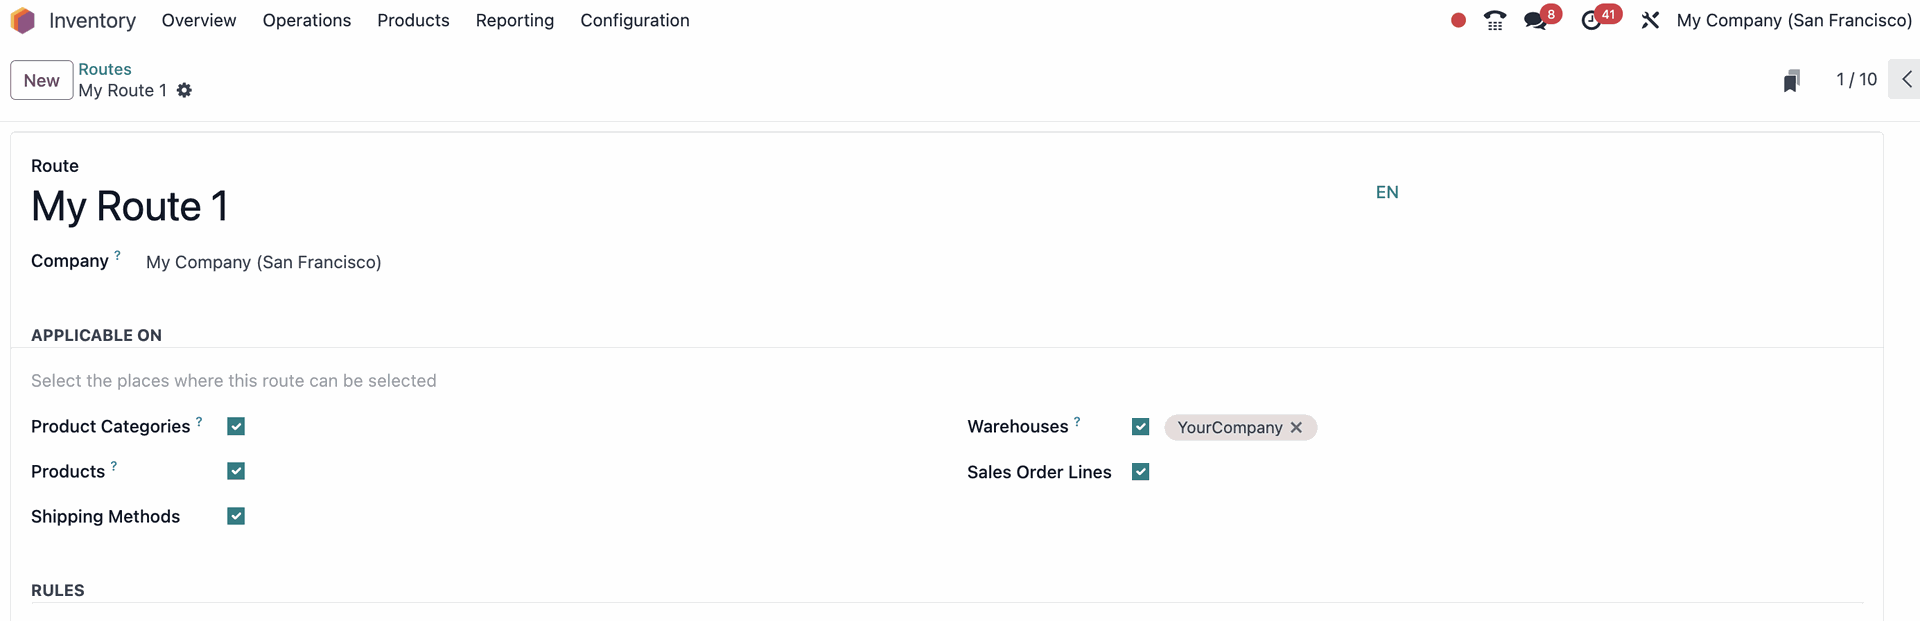
Please note:
- If a route is Applicable On Warehouses, all the transfers occurring inside that specific warehouse and meet the conditions of the route’s rules will then follow that route.
On the other hand, when a route is Applicable On Sales Order Lines, it must be manually chosen when creating a quotation.
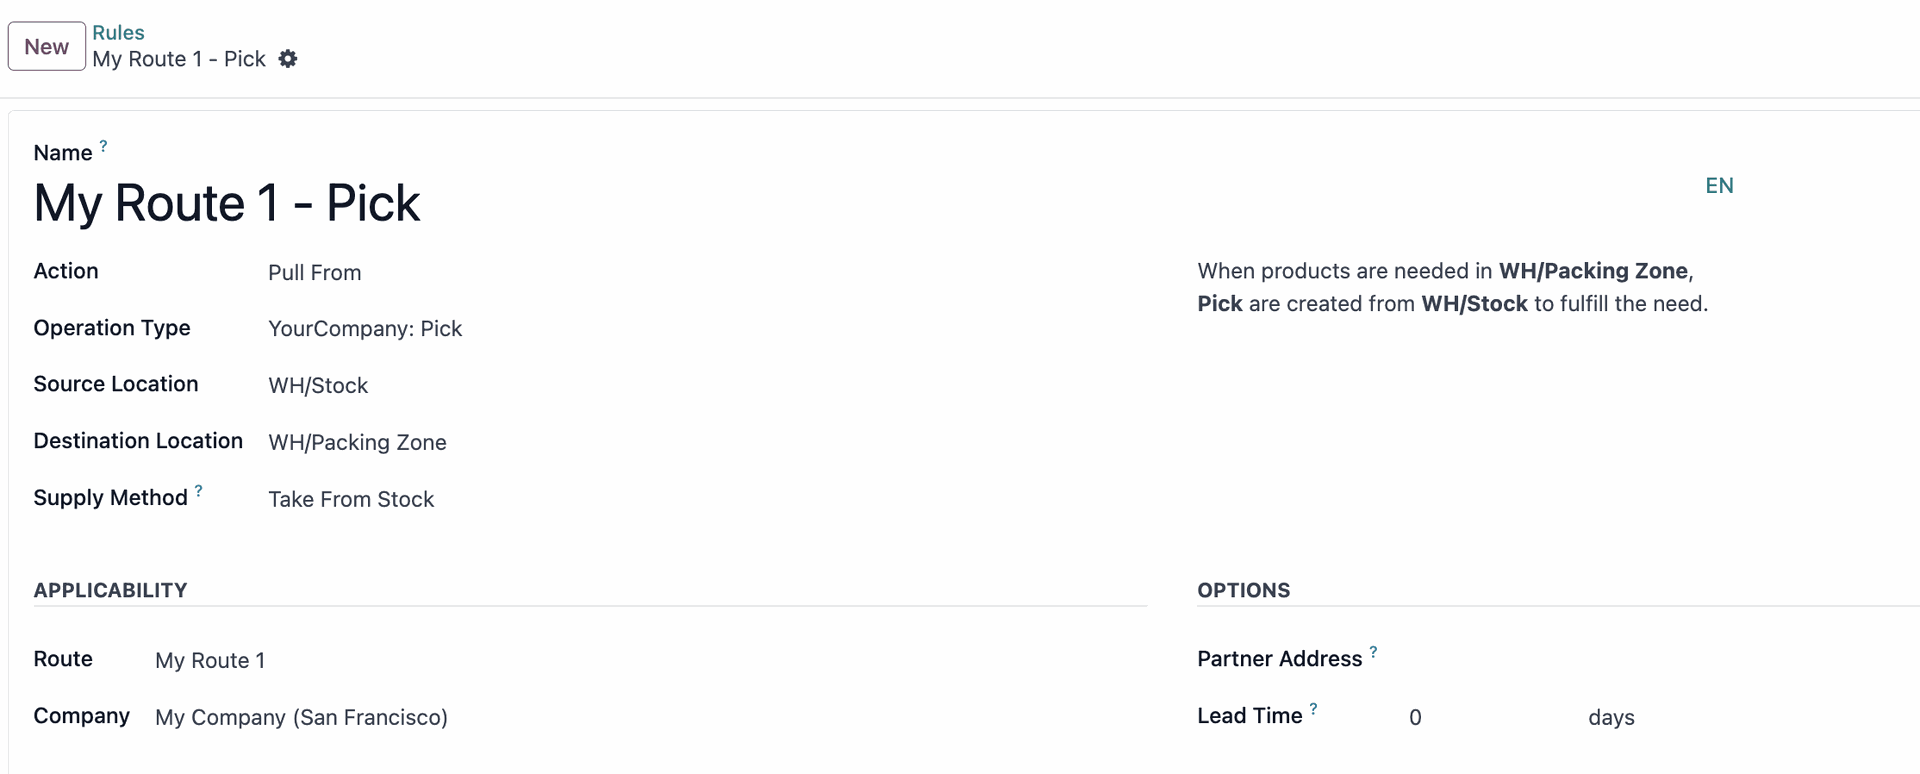
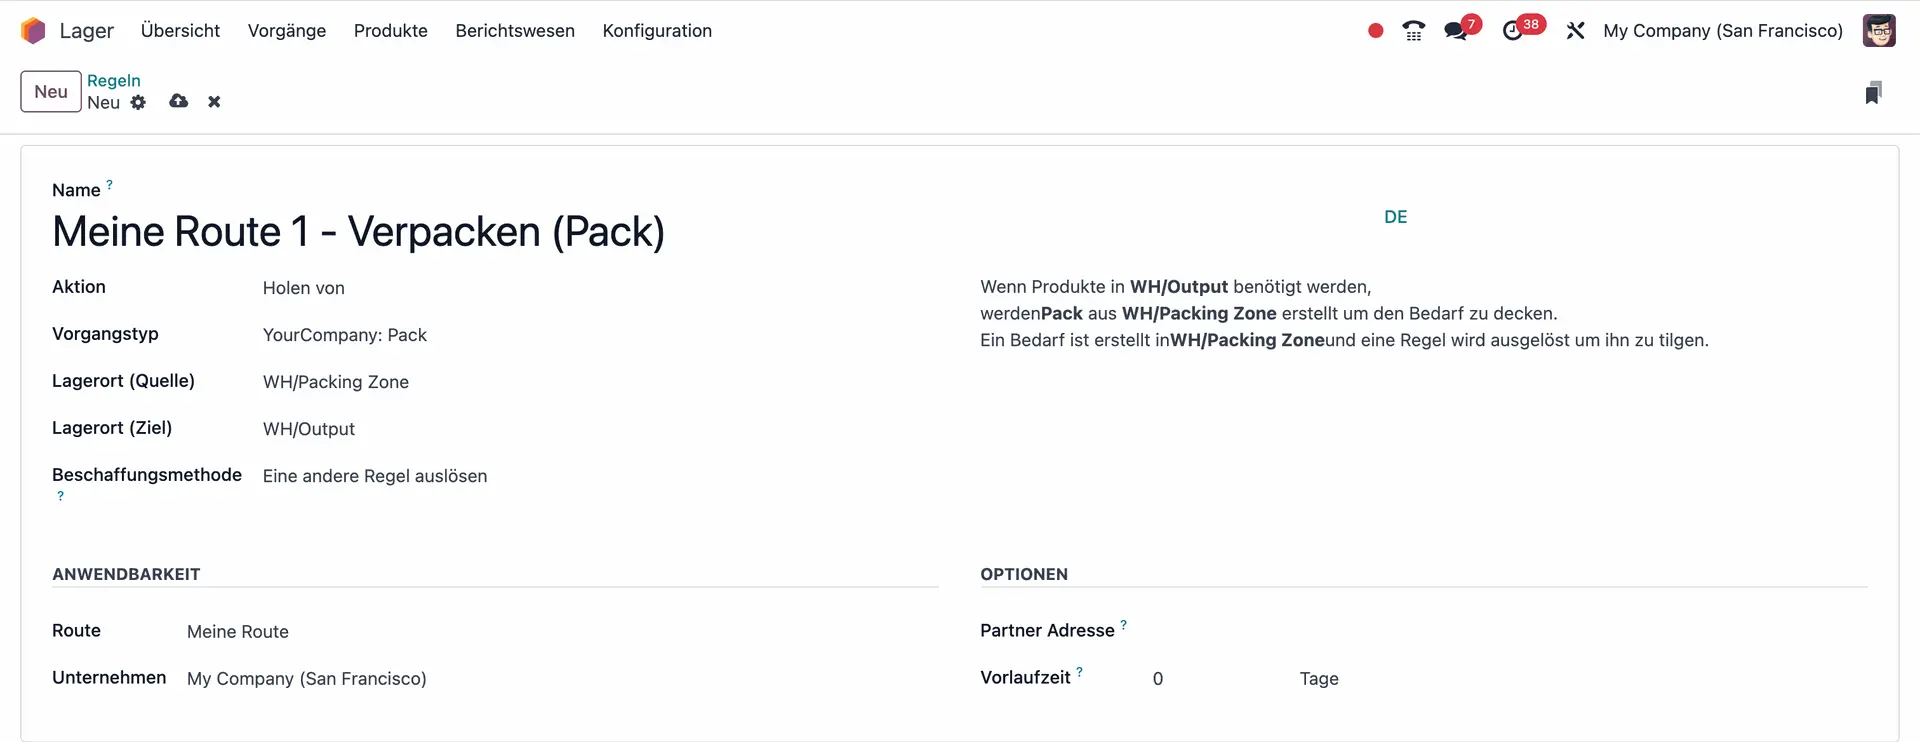
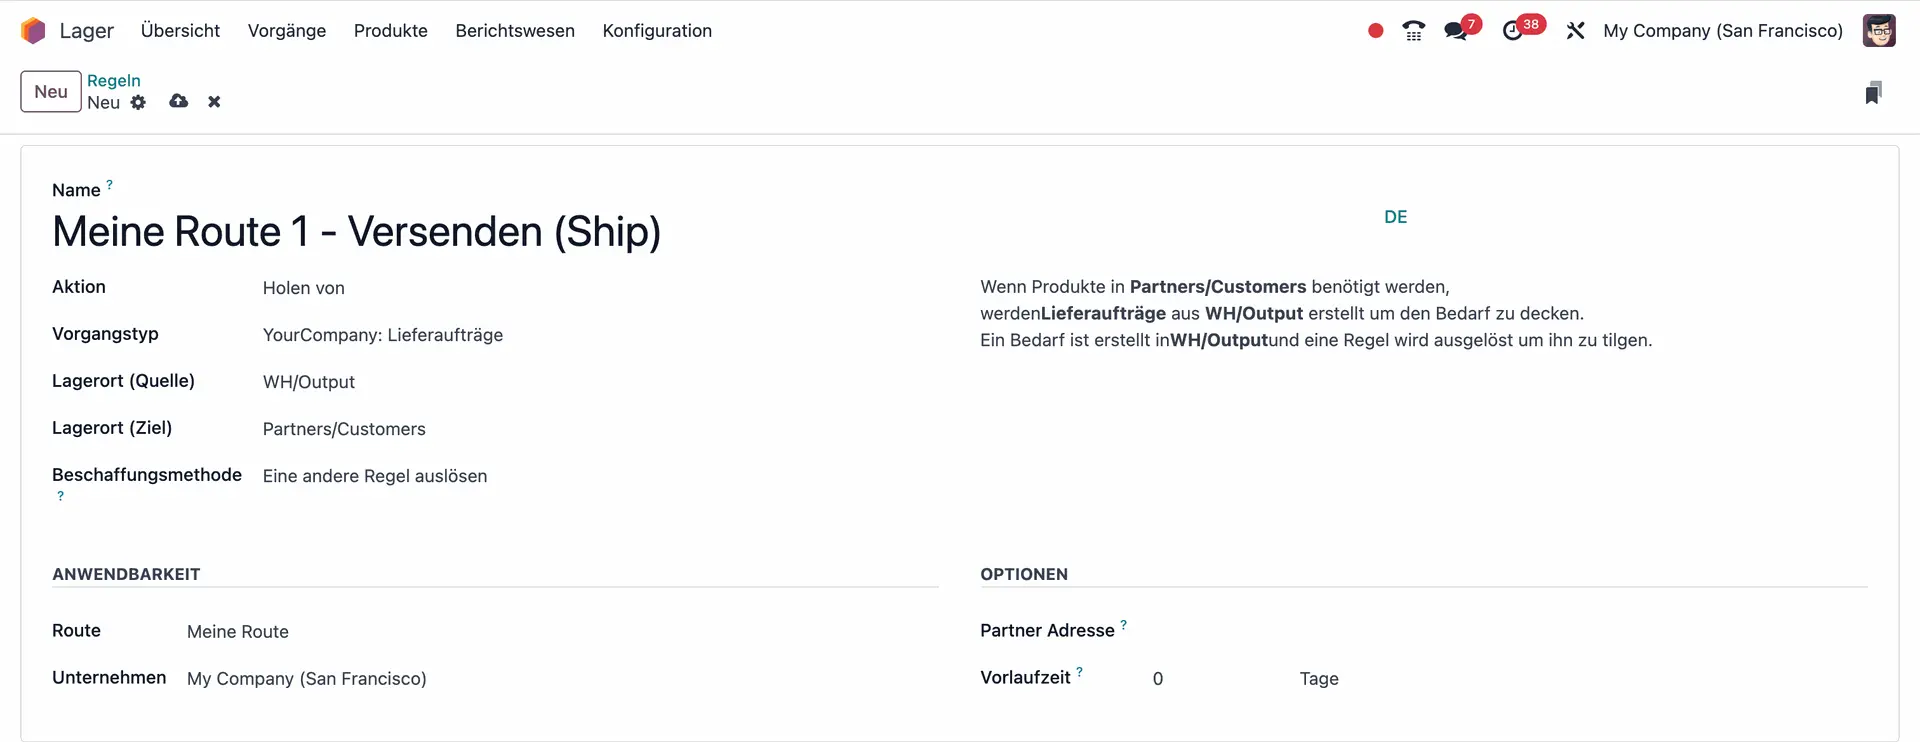
3. Define the Rules
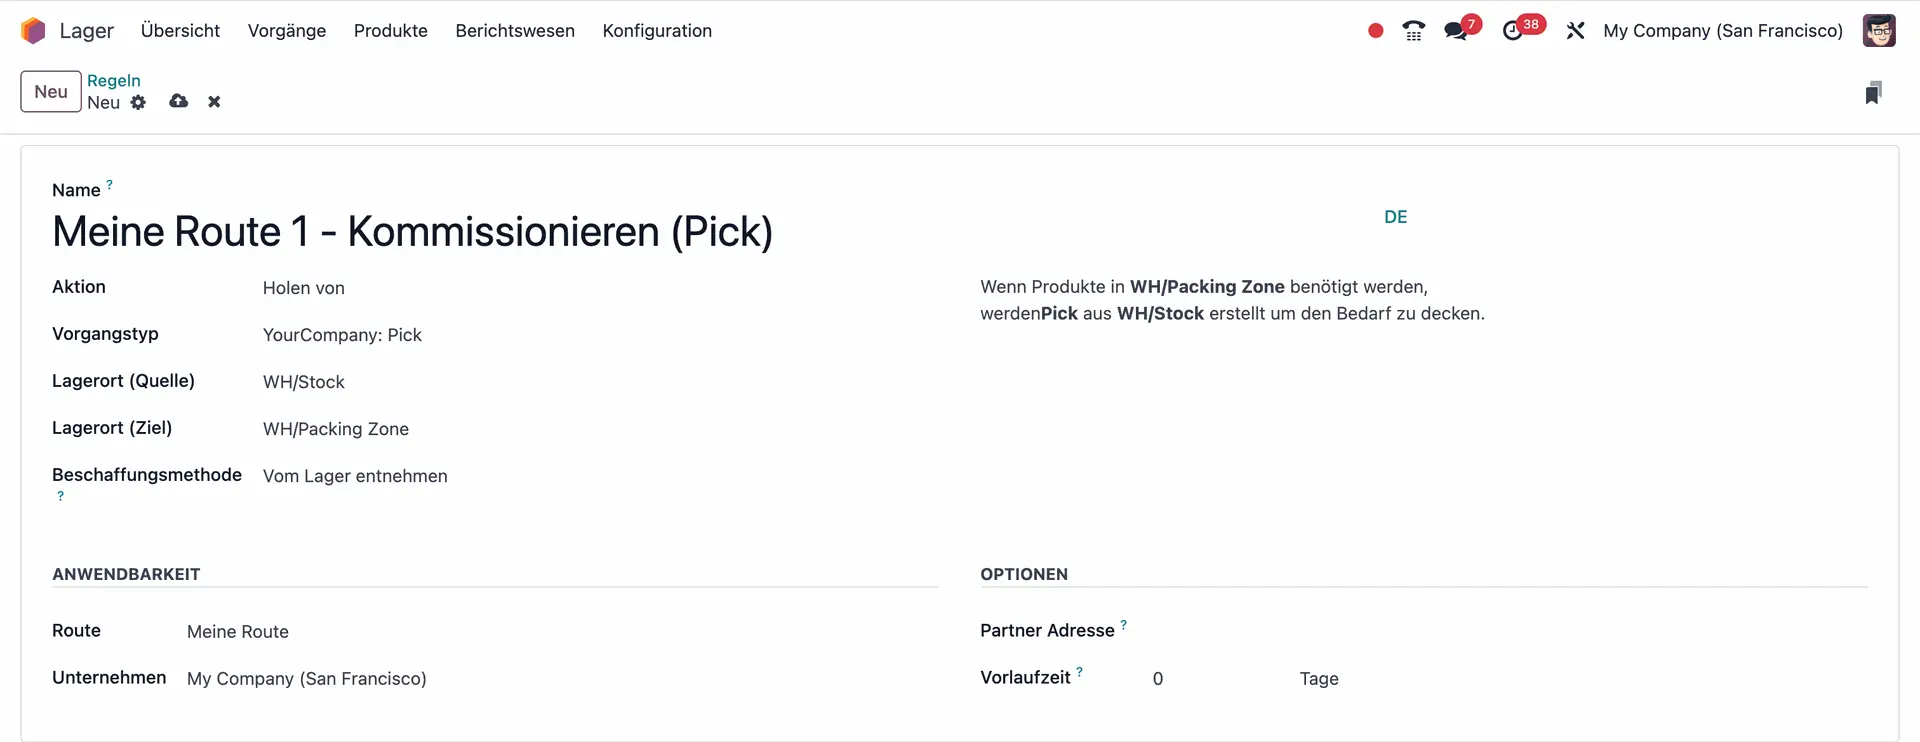
Next, you need to define the Rules that will trigger the movement of products along the Route. To create a Rule, navigate to Configuration > Rules.
There, click on “New”. You will have to define the conditions of each Rule for a specific route. In the Applicability section, you will be prompted to select the Route to which the rule should be applied.
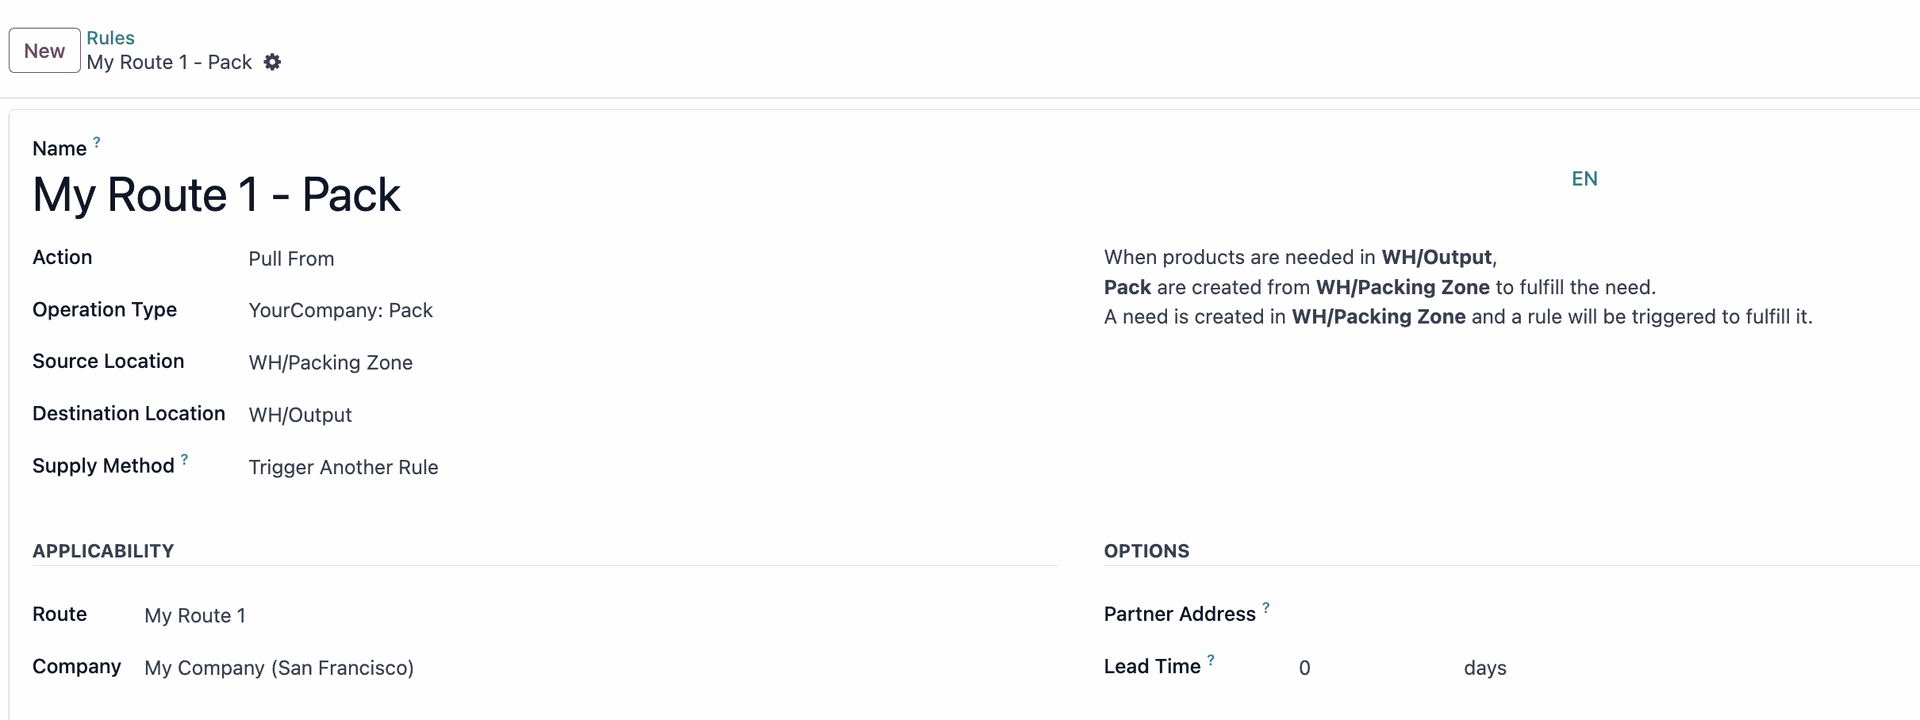
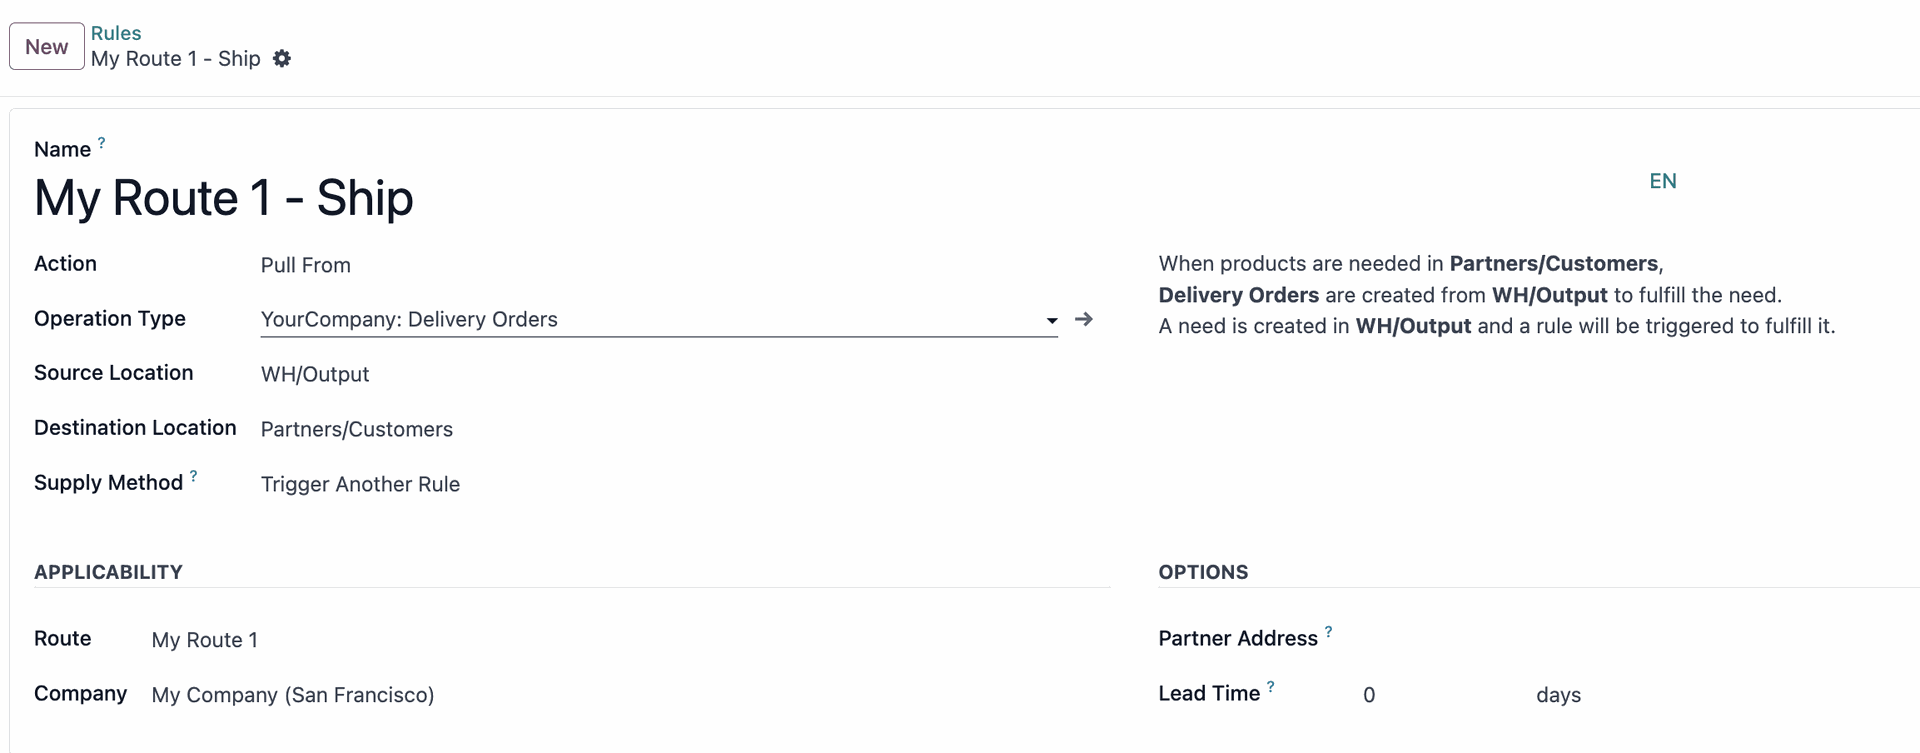
When creating a new rule, you will have to fill out fields like Action, Operation Type, Source Location, Destination Location, and Supply Method.
As an example, below you will find the Rules setup for a pick-pack-ship Route.
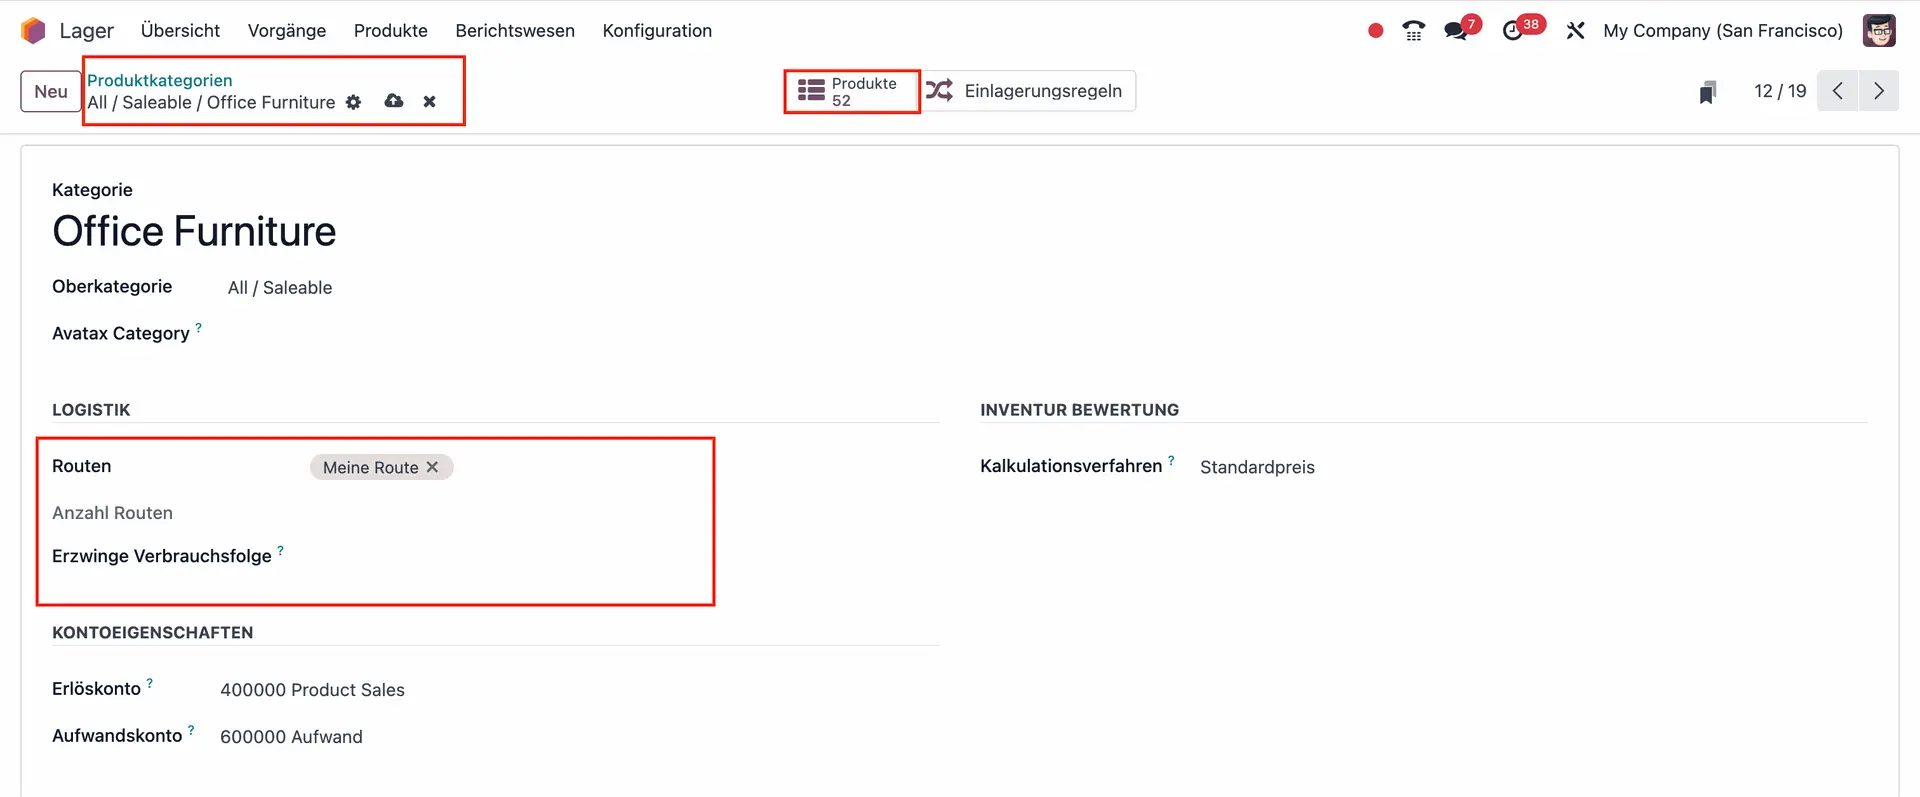
4. Apply your Route to Product Categories or Individual Products
Did you set your Route to be applicable on product categories? In that case, it needs to be manually set on the Product Category form.
It’s important to note that when a route is applied to a product category, the rules are applied to every product in the category.
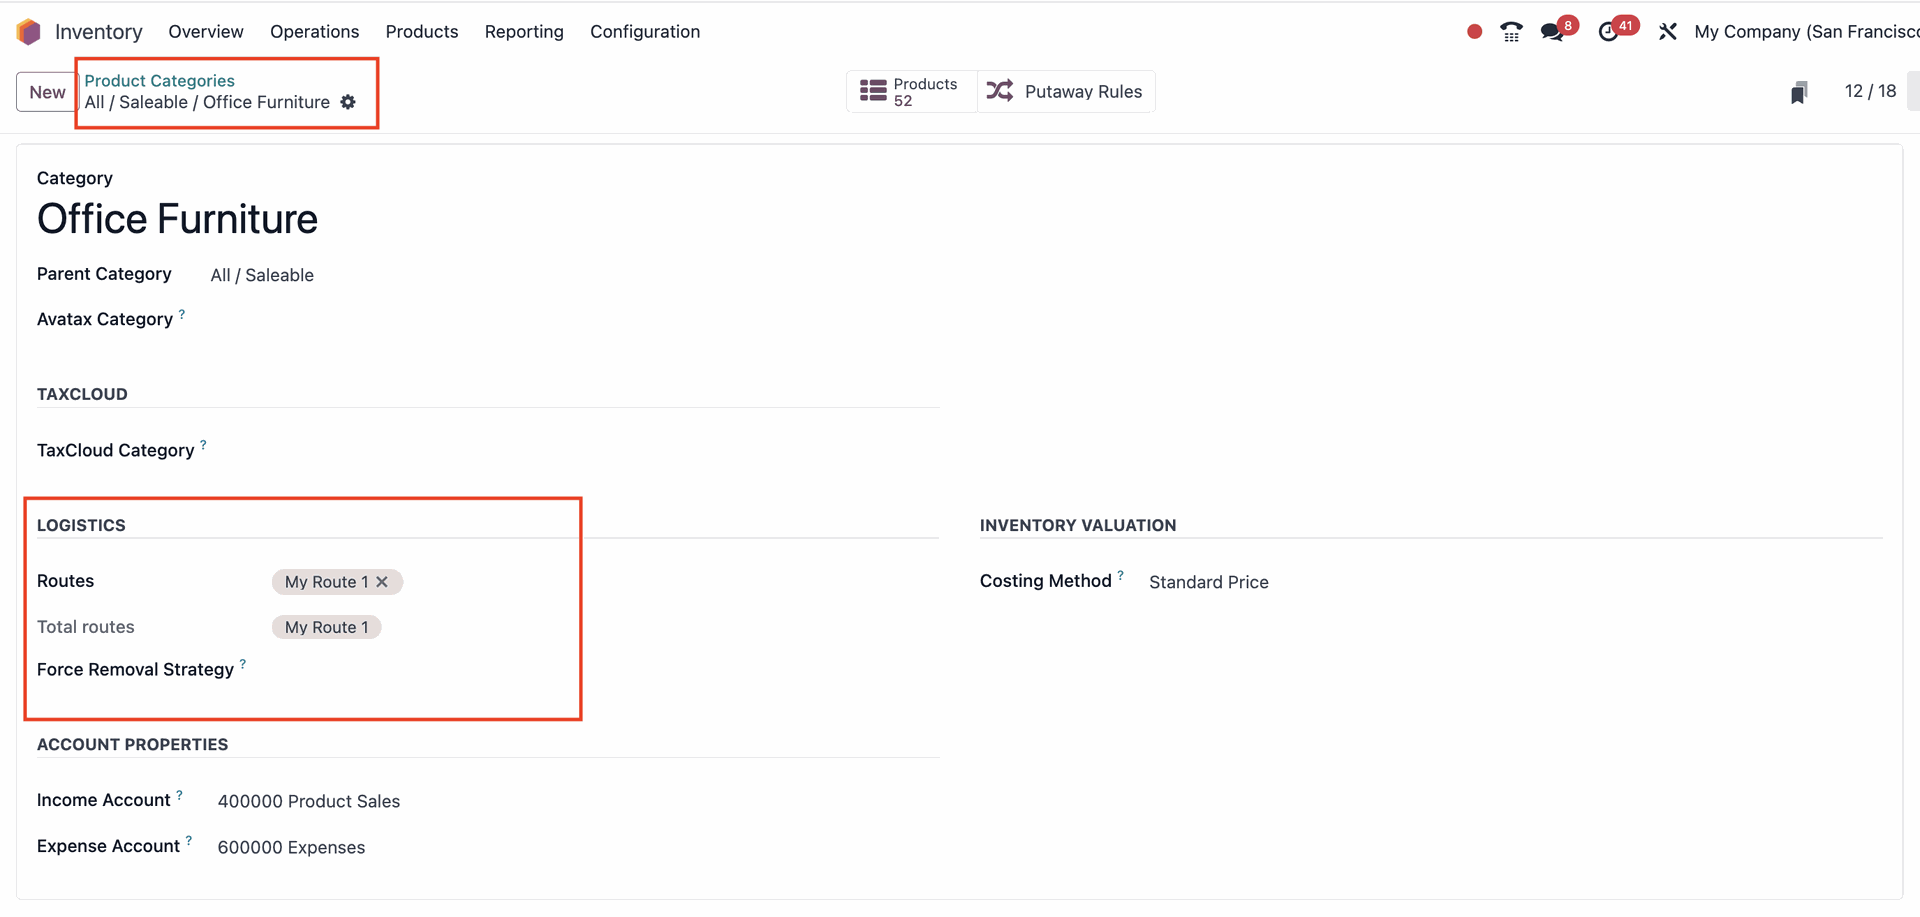
- To set this up, navigate to Configuration > Product Categories. Then, select and open your chosen Product Category.
- Next, click Edit and set the Route under the Logistics section.
- Your route is now applicable for all the 52 products of your product category
5. Your new Custom Route is ready to use!
Once these settings are in place, you will be able to apply your Custom Routes to whichever Product, Product Category, Warehouse, or Sales Order you want.
Be aware that each setting – from Applicability to Rule setups – ensures that every Route functions in a specific way that is most suited to your needs. It’s crucial to keep this in mind when configuring your Routes & Rules!
Learn more about Odoo 17 from our experts!
Are you navigating through a complex inventory setup, or looking to upgrade your overall business processes? We have a team of Odoo experts ready to help! With extensive knowledge and exper, we can guide you in implementing your Odoo 17 project and help your business thrive. Get in touch and let’s discuss how we can tailor Odoo to meet your requirements!
How do Routes & Rules in Odoo 17 work?
In Odoo, you can configure a product’s supply chain process using Routes, which consist of sets of so-called Pull and Push Rules. Once configured, the Inventory app can automatically generate transfers based on these rules.
In simple terms, Routes define the path that a product takes within the warehouse, while Rules define the conditions under which a product should be moved along that path.
For example, in Odoo a Route might specify that products should be transferred from the Receiving area to the Storage area, while a Rule might specify that products with a certain stock keeping unit (SKU) should be automatically transferred from the Receiving area to the Storage area once they reach a certain quantity.
Automated routes can be used for many purposes
With the Routes and Rules feature in Odoo 17 businesses can reduce the amount of manual labor involved in moving products between different areas of the warehouse. It also helps to ensure that products are moved efficiently, leading to shorter lead times.
The Routes and Rules feature in Odoo 17 holds benefits for various industries:
1. Manufacturing
- Smoother Production: Automate material flow from reception to production to dispatch.
- Higher Productivity: Use smart rules for timely material handling and increased output.
2. E-commerce
- Quicker Order Fulfillment: Move products to shipment as soon as an order is confirmed.
- Happy Customers: Speedy, precise order processing boosts loyalty.
3. Retail
- Always Stocked Shelves: Keep products flowing to where customers can find them.
- Increased Sales: Keep the right amount of stock to ensure continuous product availability.
Pre-configured vs. Custom routes in Odoo 17
Odoo offers two types of routes for inventory management: pre-configured and custom.
Pre-configured routes are ready-to-use solutions designed for common industry practices, such as dropshipping or cross-docking, allowing businesses to quickly adopt standard logistics processes. Custom routes, on the other hand, provide flexibility and enable businesses to tailor the movement and handling of products to their unique operational needs. This customization can address complex use cases that pre-configured routes cannot, by defining specific conditions for how and when products are moved.
The choice depends on whether your business prefers ease of use or needs specific, customized control over their inventory.
How to set up pre-configured routes in Odoo 17 step-by-step
Step 1: Enable Multi-step Routes
- Go to the Inventory app in Odoo
- Navigate to Configuration > Settings and scroll down to the Warehouse section
- Click on “Multi-Step Routes” to activate Routes
Step 2: Set Warehouse Configurations
- Go to Configuration > Warehouses and open an existing Warehouse form
- There, you’ll be able to view already pre-configured Warehouse Routes like “Incoming Shipments”, “Outgoing Shipments".
Step 3: Check Odoo-generated Routes
- Once you have set the Ingoing & Outgoing Shipments routes, navigate to Configuration > Routes. Here you will find the routes that Odoo automatically generated
- Click on a route to open the route form. In the route form, you can see which places the route is Applicable On. At the bottom of the route form, you can also view the specific Rules for the route. Each Rule has an Action, a Source Location, and a Destination Location.
Pro tip: You can set routes so that they only apply to a specific company. This is especially useful for multi-company environments, for instance when a user can have a company and warehouse in country A and a second company and warehouse in country B.
How to configure and create custom routes in Odoo 17
1. Check warehouse structure configurations
First, you need to check that the structure of your warehouse is well defined. This includes locations for each area of the warehouse, such as the receiving area, storage area, and shipping area. You can do this by navigating to Configuration > Locations.
2. Create a new Route
Once you have defined your warehouse structure, you can create a Route that defines the path that products will take as they move through the warehouse.
To create a Route, navigate to Configuration > Routes and click the “New” button. Give your Route a name and select the places in which this Route would be Applicable On.
Please note:
- If a route is Applicable On Warehouses, all the transfers occurring inside that specific warehouse and meet the conditions of the route’s rules will then follow that route.
On the other hand, when a route is Applicable On Sales Order Lines, it must be manually chosen when creating a quotation.
3. Define the Rules
Next, you need to define the Rules that will trigger the movement of products along the Route. To create a Rule, navigate to Configuration > Rules.
There, click on “New”. You will have to define the conditions of each Rule for a specific route. In the Applicability section, you will be prompted to select the Route to which the rule should be applied.
When creating a new rule, you will have to fill out fields like Action, Operation Type, Source Location, Destination Location, and Supply Method.
As an example, below you will find the Rules setup for a pick-pack-ship Route.
4. Apply your Route to Product Categories or Individual Products
Did you set your Route to be applicable on product categories? In that case, it needs to be manually set on the Product Category form.
It’s important to note that when a route is applied to a product category, the rules are applied to every product in the category.
- To set this up, navigate to Configuration > Product Categories. Then, select and open your chosen Product Category.
- Next, click Edit and set the Route under the Logistics section.
- Your route is now applicable for all the 52 products of your product category
5. Your new Custom Route is ready to use!
Once these settings are in place, you will be able to apply your Custom Routes to whichever Product, Product Category, Warehouse, or Sales Order you want.
Be aware that each setting – from Applicability to Rule setups – ensures that every Route functions in a specific way that is most suited to your needs. It’s crucial to keep this in mind when configuring your Routes & Rules!
Learn more about Odoo 17 from our experts!
Are you navigating through a complex inventory setup, or looking to upgrade your overall business processes? We have a team of Odoo experts ready to help! With extensive knowledge and exper, we can guide you in implementing your Odoo 17 project and help your business thrive. Get in touch and let’s discuss how we can tailor Odoo to meet your requirements!